If you dug into eCommerce topics, you’ve likely heard of WooCommerce. It is one of the top WordPress plugins used on WordPress. But if you want to know how to leverage it, this guide will show you how.
Below, we will teach you the basic steps you need to take to become a successful WooCommerce user and How to Set up a Woocommerce store with this Woocommerce Tutorial.
What is WooCommerce?
WooCommerce is an open-source eCommerce platform made exclusively on WordPress. It started as WooThemes in 2008, shifting focus solely to eCommerce offerings in 2017.
WooCommerce’s mission is to “democratize” eCommerce, giving people the power to sell anything anywhere. The success of WooThemes at the time had them acquired by Automatic in 2015.
Automatic is known for these products:
- WordPress.com
- Tumblr
- WooCommerce
Why Use WooCommerce for WordPress?
There are many reasons WooCommerce is popular. Here are just a few:
- Extensions to create a multi-vendor marketplace, collect payments, and integrate security
- A considerable number of themes and extensions due to the massive popularity (almost 800 total)
- Offers developer resources with its open-source ideology
- Integration with powerful tools like Google Analytics
- Great scalability for businesses of any size
- Marketing features to make advertising simple
- Shipping extensions to make calculation and inventory management simple
Unlike other ecommerce platforms, WooCommerce is specific to WordPress, one of the most uncomplicated website builders in the game. So you do not have to be exceptionally tech-savvy to use it.
Regardless, like most businesses, you have to make an account to get started.
Getting Started with WooCommerce
Before you get too deep into creating a store, you need to establish some basics:
- What do you want to sell?
- How do you want people to recognize you?
- What resources do you need to back yourself up?
Those three questions delve into branding, sourcing, and hosting, which we will discuss next.
Sourcing Your Products
When deciding what you want to sell, that determines your source. Sourcing your products will vary depending on how you want to sell.
Your kind of online store varies by the following options:
- Brick and mortar locations. Acquiring products from brick-and-mortar stores means you buy items at a discount (also known as retail arbitrage) or wholesale. Your ultimate goal is to sell items at a markup, providing you with enough profits to keep going.
- Buying from online providers. You can either do so at a discount (online arbitrage), find online wholesalers, drop ship, or private label selling. Dropshipping involves you not owning or buying any of the items, selling on behalf of another. Private label selling is when you hire manufacturers to make products with your branding on them.
- Multi-vendor marketplace selling. This mode enables you to establish a marketplace where sellers can use your website. This selling strategy is helpful if you plan on incredibly aggressive advertising campaigns or already have a known brand.
How you sell determines how much investment you need to put into it. For example, drop shippers require almost no capital to source products but sacrifice earnings as a result.
Branding Your Ecommerce Store
More than 80% of shoppers prefer brands with authenticity. Regardless of how you sell, branding can create more explicit recognition and easier exposure.
Brand loyalty elicits robust responses, creating the potential for lifelong customers. While it can be challenging, many customers are willing to act as your greatest advocates if you do things right.
A well-branded website has the following:
- A recognizable logo that people can quickly identify
- A color scheme and theme consistent across all pages
- A brand voice that identifies you as unique
Covering all three will enable your target audience to engage with you more accessible.
How to Select the Best Web Hosting Provider for WooCommerce Sites?
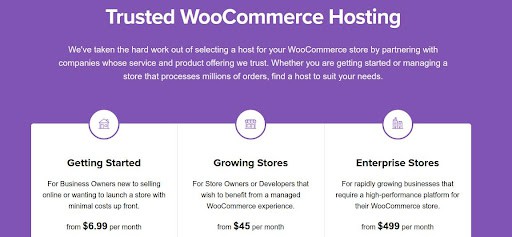
Selecting the right hosting provider is an article all by itself. Regardless, there are some easy ways to spot suitable hosting providers.
Specific eCommerce hosting services exist, but not all are created equal. Here are some hosts with proven WooCommerce success:
- Bluehost (Starting at $15 per month)
- SiteGround (Starting at $4 per month)
- WordPress.com (At about $45 per month)
- Cloudways ($12 per month)
- GoDaddy ($20.99 per month)
If you have another web host in mind, remember to account for the server resources. Hosting an eCommerce site requires a large amount of space and bandwidth.
Sites that have bandwidth limitations are no-go. Visitors limitations can also be a headache, but you can plan for that a bit easier. You’ll also need a specific hosting speed, so try and stick with SSD servers.
Pay for services depending on your growth plans. If you don’t plan on getting more than 10 thousand visitors per month for your first year, don’t pay for a service that requires more than that.
While it might be tempting to pay for more than you need, account for it in your budget. Also, be extra prepared for the post-introductory pricing. Almost all hosting plans more than double after the initial years worth of hosting.
How to Set Up WooCommerce (Step-By-Step Instructions)
Step One: How To Install and Set Up WooCommerce
With basics out of the way, you’ll need to be able to set up a WooCommerce account. This means getting a WordPress Business account or a third-party hosting plan.
If you are hosting through WordPress.com, you must select pricing options when creating your account. The cost is a minimum of $45 per month, which allows you one site through WordPress’s platform. Given the cost, most people like to choose third-party platforms.
You’ll also need to take the time to choose your domain name. Most third-party hosting platforms will include one free domain name for a year. If your hosting platform doesn’t offer free domains, pick a domain provider like Namecheap.
You’ll want to do a bit of research before naming your store to be sure nobody else has copyrighted this. A domain name search provides you with a good idea, but you can also search using the USPTO database. This will give you protection if your store gets big enough to emulate. Performing these steps is optional but will save you trouble down the road.
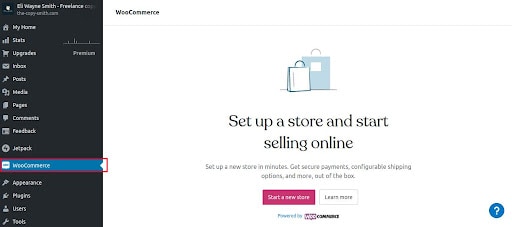
Once you make a domain, you’ll need a WP account. These third-party platforms will bring you through the process of creating a WordPress account. Once you create a WordPress account, you’ll click on plugins on the left-hand navigation bar.
Because Automatic owns WooCommerce and WordPress, you need to integrate the platforms. You can also choose to connect WooCommerce with Jetpack, which is an excellent security suite.
Step Two: How to Add and Manage Products With WooCommerce
You’ll installation was done right when you see WooCommerce in your left-hand navigation bar. From there, you will see a products tab underneath it; this is our next step.
Add a Product
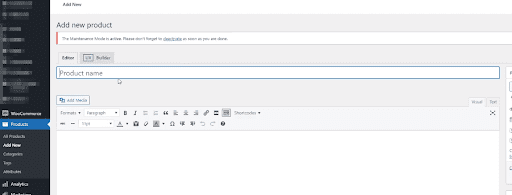
Start by clicking on the Products tab underneath the navigation. Clicking on “add new” underneath will bring up the product addition screen.
Familiarize yourself with this screen, as you’ll be using it a lot. Here are some areas you need to focus on:
- Product Title – The first thing people see must clearly define your item.
- Description – The detailed report must describe all the reasons someone should buy your product.
- Product Category – A method in which to sort different product types
- Product Data Box – Contains details on the price, inventory levels, shipping data, attributes, and whether the product is virtual.
- Short Description – The shorter description is a catchy and direct version of the long-form option. Given that people are more likely to read it, it is imperative to display the best features here.
- Product Images – The addition of a picture featuring what you sell (ideally, alongside people using it). This has a single featured image that should only display your product.
Those familiar with creating blog pages on WP will find this pretty similar. The difference is the product attributes and types.
Step Three: Creating Attributes, Variations, and Categories.
Highlighting attributes provides people with more information about the product they are buying. For example, selling a blue toaster makes it more niche, appealing to specific kitchen types.
Variations (or a variable product) are helpful when selling many items with minor changes—for example, clothing with similar designs and a wide range of colors. Variants appear as a drop-down menu on the product page.
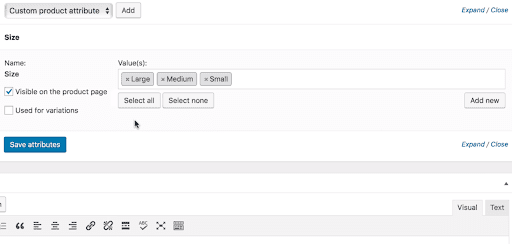
You’ll want to combine these with different categories (or types of products) to determine what kind of general item people are searching for.
The easier you make it for users to navigate your website, the more sales you will make. Google is also a stickler for good design, often promoting shops that manage this for keywords.
Step Four: Choose Your Payment Options
Choosing your preferred payment gateway is a necessary part of the process. Without this setup, people won’t be able to buy your product.

Your preferred payment gateway depends on what you want to accept. Here are the most popular payment extensions:
- Stripe is the most popular option for accepting debit, credit, and local payments.
- WooCommerce Payments is automatically integrated, making it the most straightforward option.
- PayPal has the most experience and works best using multiple eCommerce platforms.
- Afterpay is fantastic to improve your conversion rate by selling products over four installments.
- Square is another popular payment option suitable for local POS transactions.
The best payment methods depend on your risk tolerance and selling methods. You probably don’t want to offer split payments if your risk tolerance is low. Also, you might not need local payment methods if you do not sell locally.
Step Five: Configure Your Shipping Options
The best shipping methods come from your chosen sales strategy. For example, selling digital products is an excellent way to cut down shipping costs.
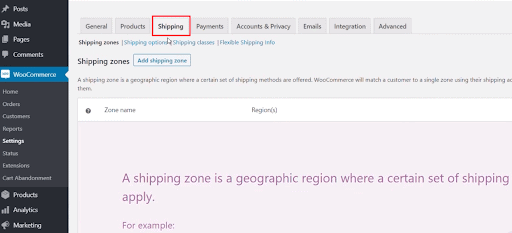
Dropshippers also don’t have to worry about shipping costs, as those are (usually) part of other fees. Having a higher number of products might also cause you to rely on a fulfillment service.
Here are some options WooCommerce offers:
- WooCommerce Shipping offers the ability to calculate costs and print USPS and DHL labels from your home.
- ShipStation imports orders automatically and sends automated emails to your customers while offering discounted shipping rates. This can be from an email address that does not accept incoming mail.
- UPS, FedEx, and USPS APIs can help you simplify the calculation of shipping costs.
- WooCommerce also integrates with Fulfillment By Amazon if you only want to hand in shipping and warehousing but want more quality control than dropshipping.
Step Six: Choosing a WooCommerce Theme and Customizing It
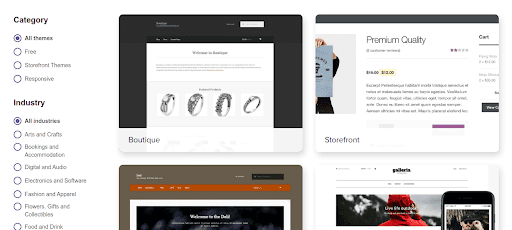
WooCommerce offers more than 40 themes to choose from, providing solid customization options. Using the WooCommerce Theme Store is the easiest way to select your options.
It would be best to choose between three of the available free themes for limited budgets. The themes are all customizable using WordPress’s website builder. So you can make the piece your own with little to no coding knowledge.
Storefront is the best free theme to build from because it has a simple basis. Standard WordPress themes do not integrate well with WooCommerce.
Step Bonus: Important Areas New Sellers Miss
Checkout
The check screen is the before-and-after look at what products your customer purchases. It should be relatively simple and have a big, colorful shopping cart button for easy purchasing.
After clicking the buy button, you need to ensure that checkout emails are set up correctly. To do so, go to the settings area of WooCommerce under your WP navigation bar and select emails.
The Processing Order Email template notifies (and thanks) users for their purchases. If it isn’t active, you aren’t sending them. If they aren’t receiving them, check the WP mail logging plugin.
Orders
The order screen tells you what items were purchased recently. This will enable you to gather shipping data if you handle fulfillment personally. It also allows you to check up on your dropshipping partners if they are getting orders out.
To ensure your dropshipping suppliers have access, you can add them under the Products > suppliers area of WordPress. They will also likely give you a CSV file to upload their products.
Coupons
Under settings > general, you will find the manage coupons screen. Clicking this screen will enable you to establish custom coupons. Both coupons and sales are a great way to attract incoming customers and increase conversions.
Clicking the “add coupon” on the top will enable you to add a coupon code, provide a general description, and set some rules (usage limits, free shipping, etc.)
Conclusion – Final Tips to Grow Your WooCommerce Store
WooCommerce is an excellent and powerful platform for varying skill levels. Regardless of your level of experience, it is ideal for long-term strategy. Given that it is owned by the company that owns the company it makes plugins for (WordPress), it’s likely to stick around for a long while.
Here are some final tips to remind you to stay focused:
- Try and create an email list with regular content that engages users. You can also use the list to make product announcements.
- Establish social media accounts across Facebook and Twitter. Instagram is a great way to show off physical products.
- Don’t forget to price for profit. Outselling your competition doesn’t help if you aren’t making any money.
- Pay for advertising for short-term earnings and use SEO to plan for long-term gains, don’t rely solely on one or the other.
- Don’t forget to celebrate your victories. It’s important to remind yourself how good you are at this.
Benjamin Shemesh is an ecommerce enthusiast and a digital marketing expert.
He loves surfing the ocean
