Bigcommerce Online Store-a Beginner Tutorial
When it comes to creating your eCommerce empire, BigCommerce is one tool many people recommend. They serve 60 thousand stores, worth over $110 billion after 2020. But does this success translate to scalability for eCommerce business owners? Below, we will answer that question in this Bigcommerce tutorial.
What is BigCommerce?
BigCommerce is an Australian-born company founded in 2009. The company, then known as Interspire, grew to become BigCommerce, one of the biggest ecommerce platforms today.
The company went public under Nasdaq: BIGC. Today, the company services well-known brands like Skullcandy, Ben & Jery’s, and Black Diamond.
BigCommerce’s most unique offering comes from its support for CBD and hemp companies. Most eCommerce sites refuse to offer solutions for these products, as the legality of some of them is questionable. The signing of the 2018 Farm Bill changed a lot regarding THC regulation.
BigCommerce has two different services catered for different company sizes:
- Enterprise
- Essentials
If you are new to eCommerce, you’ll likely stick with BigCommerce Essentials. Below, we will explain how to get started.
How To Create an Account on BigCommerce
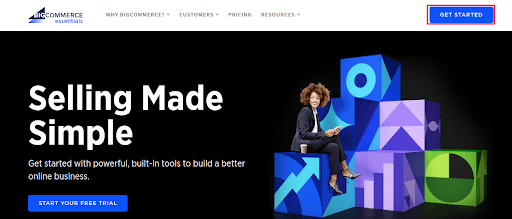
Start by accessing the site’s main page and clicking on the “Start Your Free Trial” button. From there, you’ll need to follow prompts to enter the following information to create your BigCommerce Profile:
- Name
- Phone Number
- Preferred password (eight characters with one letter and one unique character)
- Whether you have an existing website
- Your Store Name (which you can change later)
- The product category you plan on selling in
- How do you currently sell products
BigCommerce account gives you a 15-day free trial to explore their services. Use that free trial fully to determine whether this platform is comfortable for you.
Checking Out The BigCommerce Dashboard
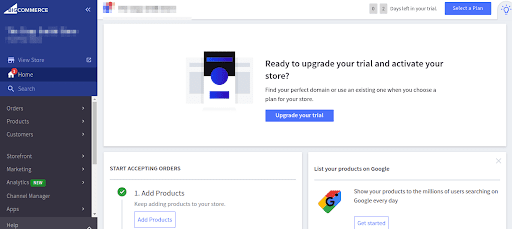
The dashboard is relatively similar to what you might expect from WooCommerce. The difference is it isn’t built into another dashboard (i.e., WordPress). Being Geared to eCommerce starts immediately with order tracking, product addition, and customer details.
Focus on the four-step process under the “home” link on the left-hand dashboard to keep things simple.
Step One: Creating Your First Product
Click the big “Add product” button in the middle dashboard to add your first item. Otherwise, you can navigate to the page by clicking the “products” tab on the left.
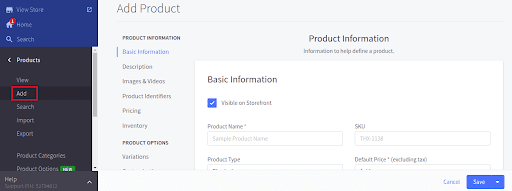
From there, you’ll be able to input the following information:
- Product Name – The title of the product you are selling
- SKU (Stock Keeping Unit) – A number identifying tracking details and inventory levels of an item.
- Product Type – Whether your thing is digital or physical
- Default Price (This does not include taxes)
- Brand – This is a category if you sell multiple brands.
- Category – Sorts if you sell multiple item types (i.e., bath, kitchen, etc.)
- Description – A detailed report where you give people all the reasons they should make a purchase
- Images & Videos – Media provides people with images of your product. Ideally, this should include examples of it in use and instructions)
- Files – Offers downloadable content when people purchase your item (i.e., for digital content or an instruction manual)
- Product identifiers – Includes necessary product identifiers like SKUs, MPNs, UPCs, GTINs, and BPNs. These are primarily for tracking purposes.
You can use listings from other marketplaces for inspiration. You can also use some of the sample products included in your default shop to get started.
Step Two: Managing and Sorting What You Sell
Once you add your first item, this gives you a good idea of how the system works. Depending on your shop size, you might want to work on sorting.
You have three options for sorting: variations, customizations, or categories.
Variants
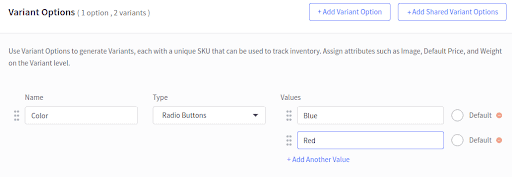
Product variants, which will have unique SKUs, are slight differences on similar products. For example, different color clothing comes in variants. You will know if people are ordering one variant faster than the other with different SKUs, allowing you to restock selectively.
Shared variants are helpful when you have many similar slight differences. You might have multiples of the same shirt color on different shirt styles.
Modifiers
Modifiers are another page aspect that allows people to apply customizations. For example, some of your customers might like custom monograms with their initials. There are also shared modifiers if you have multiple products to benefit from custom options.
With both modifiers and variants, you can select from a dropdown menu, use radio buttons, or have your users upload files, including their desired customizations.
Categories

Product categories enable users to sort through larger shops to find specific things they want. If you shop on Walmart.com, you won’t look for microwaves in the “Bath” category.
Categories are handy if you are a more prominent eCommerce seller. The more you have to sell, the more you want to make it easier for customers to find your products.
Step Three: Creating Your Storefront
This step has you clicking on the “Storefront” text button on the left side of the navigation bar. BigCommerce allows you to customize your storefront through the following means:
- Themes
- Logos (Allows you to select your store name as the logo or upload a custom logo and Favicon)
- A home page carousel (this allows you to insert specific images and alt texts for your home page carousel images if the theme needs those)
- Social links
- Scripts (for developers)
- Web pages (allows you to create new and custom pages like blogs, contact us pages, shipping & returns information, and additional custom pages (i.e., about me page
- A store blog
- Image manager (allows you to upload all your essential images)
- Gift certificate templates (giving your customers birthday gifts or other seasonal offers)
Customizing Your Theme and Using the Marketplace
The number of complementary pieces available on BigCommerce is pretty impressive. But there are also more available paid themes with specific customization features.
If you aren’t happy with your default theme, use the theme marketplace to pick a new one.
You can also customize those themes by modifying colors and these drag-and-drop features:
- Text
- Image
- Carousel
- Video
- Products and sets
- Buttons
- Custom HTML
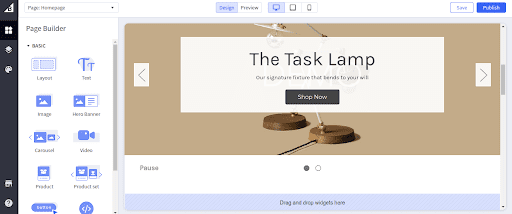
Thems and customizations from within the website builder allow you to change the general themes. The navigation bar has less customization, built from the theme you chose.
Product categories you established earlier will be part of the navigation bar. So the store has a pretty intuitive interface, focusing on simplicity over customization.
In a battle of BigCommerce Vs WooCommercee, the WordPress platform gives the customization edge. BigCommerce isn’t built from WordPress and has a 100% custom website builder.
Blog Posts on BigCommerce
BigCommerce has a simple interface for blog creation. While it isn’t as powerful as WordPress, it does offer rich text editing features. Here is what you’ll need to fill in:
- Title
- Body (the text of your blog posts)
- Author (who gets credit)
- Tags
- Thumbnail image
- Post URL
- Meta description (to describe the blog)
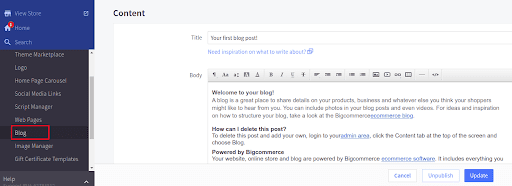
Informative blog posts are an excellent way to gain long-term traffic to your store. BigCommerce SEO seems to downplay this slightly, as its blog editor is weak compared to other providers. What it lacks in blog features makes up for by having other robust features.
Step Four: Important Store Setup Features
The last area of importance involves the necessary setup features your store needs to function. Here’s what you need to look at:
Store Profile
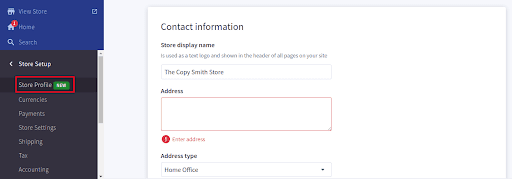
The store profile is what customers see on your “contact us” page. It includes your business address, email, and phone number. You can also establish your default country and language from this page.
Automatic translation is also available if you want to work across multiple languages. However, automatic translation might not have the same quality as hiring a third-party translator.
Receiving Payments and Selecting Currencies
Establishing payment gateways and selecting currency types bleed into each other. It would be best to be sure that your payment processor supports it to add a currency.

If you plan on expanding internationally, choose your process depending on what they support. Here are the available payment processors BigCommerce provides:
- PayPal – Given its international recognition and support for over 100 currencies, this is the best option for those international planning expansions.
- Stripe – Includes machine learning anti-fraud features and support for a wide range of platforms.
- Sezzle – a buy now and pay later platform great for attracting new customers.
- Afterpay – The same thing as Sezzle (only used across more than BigCommerce)
- Bolt – A lesser-known integrated payment platform.
For more selective support, you can also set up offline payments, online payments, and support for specific online wallets. Using a particular processor saves you time (but costs more money).
Establishing Shipping Rates
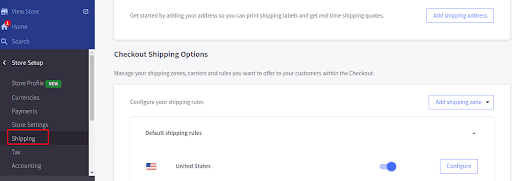
Adding your address will enable you to get shipping quotes in real-time. BigCommerce shipping integrations also include support from these platforms:
- ShipperHQ – Enables customers to test scenarios of how much it will cost to ship to them.
- USPS – Print shipping labels from the dashboard.
- ShipStation – Support for shipping labels across numerous providers (including international ones)
- Route – Offers package tracking and order protection services.
Setting Up A Sales Tax Rate and Accounting Features
BigCommerce tax services include automated solutions through Avalara AvaTax. For those who think they’ve got it covered, you can establish manual tax systems depending on your earnings.
Tax classes depend on the amount you earn. The more you make, the more you will need to pay the government. If automated services aren’t available, BigCommerce enables you to drop on a default sales tax return of 10% (or using your manual settings).
Understanding the basics of sales tax is essential when establishing manual settings. For less effort, using the available automated services can help. Still, having regular sales tax reports can help you keep track of what is changing.
You can also integrate accounting services through Intuit QuickBooks. However, newbies to business-owning might want to consult a tax expert if there is any confusion.
Selecting The Best Premium BigCommerce Plan

Outside of BigCommerce Enterprise, the essentials plan has three options:
- BigCommerce Standard ($29.95 a month) for people making more than $50 thousand
- BigCommerce Plus ($79.95 a month) for more than $180 thousand
- BigCommerce Pro ($299.95 a month) for more than $400 thousand
Your earnings level should directly relate to what you choose for a plan. Because all of these support all available sales channels, there’s not as much reason beyond that o go to higher levels.
The Plus plan includes abandoned cart savers and grouping people by customer segmentation. However, you can also track that for free using Google Analytics.
Advanced search options are available under the Pro Plan. Specifically, more filtering options on your site-based search bar. More complex components, like bringing over an advanced SSL, are also hidden behind the pro level.
Tips for Having a Successful BigCommerce Store Launch
When starting your store on BigCommerce, you want it to work. To help you out, here are some excellent tips to keep in mind:
#1: Use BigCommerce’s Marketing Tools
BigCommerce has automated banner creation and promotion services you can create for your campaigns. While you will still need to pay for advertising services, these are built with success in mind.
While you might not want to rely on discounts, usage of the word “free” is excellent for attracting new customers. BOGO (Buy one get one) deals are particularly compelling.
You’ll want to set aside an advertising budget, typically around 5% of your budget. However, if you participate in dropshipping, your advertising budget should be a bit higher (down the road).
#2: Expand to Multiple Online Marketplaces
BigCommerce’s Channel Manage is a massive part of making it an excellent platform. When using BigCommrece, you should use it to manage multiple online platforms.
BigCommerce supports these marketplaces:
- Walmart Marketplace
- Facebook Marketplace
- Amazon
- eBay
- Wish
- Mercado Libre (for selling in Latin America)
- Clover (for Point of Sale transitions and local merchants)
- Instagram integration
- Google Ads
- TikTok
- Buy Buttons
While they won’t track most social aspects for you, they do work across a vast amount of sales channels. For those who work amongst these channels, BigCommerce is excellent.
#3: Look Through the App Store
BigCommerc’s app store includes a range of services to make your life easier. The less time you have to worry about small-time aspects of your business, the more time you can save.
Automating finances, sales takes, and CRM services are just a few examples. Check out your options by browsing the store.
#4: Generate Thought Leadership Content
Blogging s a huge part of exposure these days. Creating your own blog produces a new potential sales channel in your niche.
For example, if you want to start a blog on bowties (assuming you sell them as a big-ticket item), you can do that. Your content creation efforts will appeal to those who are looking for it.
Conclusion – What Makes BigCommerce Worth It?
BigCommerce is excellent due to its multi-channel offerings. It prioritizes an eCommerce-first approach, something WooCommerc cannot because it’s part of a larger WordPress environment.
Despite major BigCommerce cons like having weaker page editing software and blog creation options, BigCommerce has a lot going for it. If you want simplicity in your operations, BigCommerce is an excellent choice.
Benjamin Shemesh is an ecommerce enthusiast and a digital marketing expert.
He loves surfing the ocean
